Periodic Airbrush Maintenance

For your convenience we put together a diagram with step-by-step instructions for your airbrush maintenance. Please study the diagram for parts recognition and follow the step-by-step instructions on how to disassemble and assemble the airbrush.

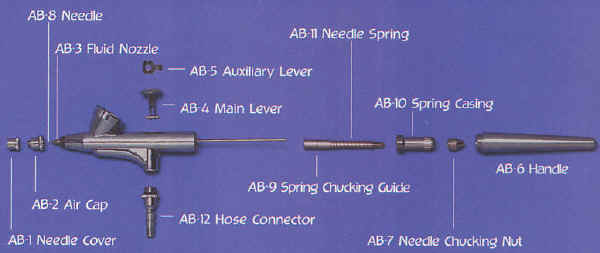
Disassembly of Airbrush
In each of the step of the disassembly, refer tot he diagram. Remove each part by turning or pulling in the direction indicated by the arrows.
  1. Pull air hose off the hose connector.
  2. Remove (7) handle be turning counter clockwise.
  3. Loosen (8) needle chuck nut.
  4. Pull (9) needle out. Be careful not to damage the point.
  5. Unscrew (11) spring guide.
  6. Remove (12) needle spring and (10) needle chucking guide respectively.
  7. Remove (5) main lever by pulling then twisting and (6) auxiliary lever by twisting then pulling.
  8. Remove (1) crown needle cap and (2) nozzle cap respectively
  9. Using the small flat wrench received with the airbrush, remove (3) nozzle. Note: The nozzle has two flat spots. Place the slot of the wrench over these slots and turn counter clockwise.

Cleaning and Lubrication
Using Airbrush Cleaner, submerge all parts, except the needle, in a glass or metal pan for a few minutes then scrub with a small paint brush until all color has been removed. Clean especially the color cup (4). Make sure you have a good liquid flow out of where the nozzle connects. Use a Q-tip to scrub the walls and to reach into the color cup. Rinse the parts with hot water and dry thoroughly with a lint-free cloth. Clean the needle with airbrush cleaner and check the point to make sure this is no damage. Look at the point of the needle for a bend or hook. Using a white piece of paper and placing the needle on it and rolling it will make it easier to see if damage exists and needs to be replaced.

Assembly
  1. Using the nozzle wrench, screw in then tighten the nozzle (3). Caution: Do not apply excessive force when tightening the nozzle.
  2. Screw on the nozzle cap (2) and hand tighten
  3. Screw on the crown cap (1)
  4. Hold the airbrush as shown in the diagram to complete STEPS 4 and 5. Take the auxiliary lever (6) and hold as shown in Diagram C. Insert inside the opening, twist so that the hump is towards the back and let it rest against the back of the opening.
  5. Before you perform STEP 5, inspect main lever (5). Notice there is a thinner rounded section on the flat part under the round head. This side goes toward the back of the opening. Refer to Diagram B. Insert main lever (5) into opening and guide the two pins into the two channels located on the walls inside the opening. Move head back against the
    auxiliary lever(6) and hold there. Hold these parts (5) and (6) secure with your finger and go to STEP 6.
  6. Insert needle chucking guide (10) channel down into the back of the airbrush. Slide needle spring (12) over needle chucking guide (10). Insert spring guide (11) over spring (12), screw in and tighten. This spring mechanism will push the main lever and auxiliary lever forward.
  7. Insert the needle through needle chucking guide (10) and slowly push all the way forward. Screw on the chucking nut and tighten securely.
  8. Cover the back of the airbrush with handle (7).

Airbrush Replacement Parts

Back to: PastryWiz - Recipes - Cake Decorating - Wedding Cakes

Privacy